Incremental Static Regeneration
Server-Side Rendering
The client sends a request to the server. The server fetches all the required data and renders the application before sending the content to the client. When the client has received the content, it is almost directly available to the user.

What are the pros and cons of using server-side rendering?
👍 Lesser JavaScript leads to quicker FCP and TTI
We don’t need JavaScript to render the site and because of that, we are more likely to get faster FCP and TTI.
👍 Provides additional budget for client-side JavaScript
You are not required to have a budget on your JavaScript in the same way as when working with client-side rendering.
👍 SEO enabled
We also are more likely to get better SEO, because the search engine crawlers easily are able to crawl the content of the site.
👎 Slow TTFB (Time to First Byte)
That all sounds great, but we should be aware of TTFB, as all of the processing is being handled by the server. With a slow server response time, the user experience will decrease, if the users are required to wait longer than necessary.
👎 Full page reloads required for some interactions
Since all code is not available on the client, frequent round trips to the server are required for all key operations causing full page reloads. This could increase the time between interactions.
Example with Next.js
With server side rendering we can use the Next.js getServerSideProps to fetch our content. In this way, the rendering will no longer happen on the client. The content will be server side rendered and the page will be loaded with data.
export async function getServerSideProps() {
  const response = await fetch("");

  return {
    props: {
      item: await response.json(),
    },
  };
}Client-Side Rendering
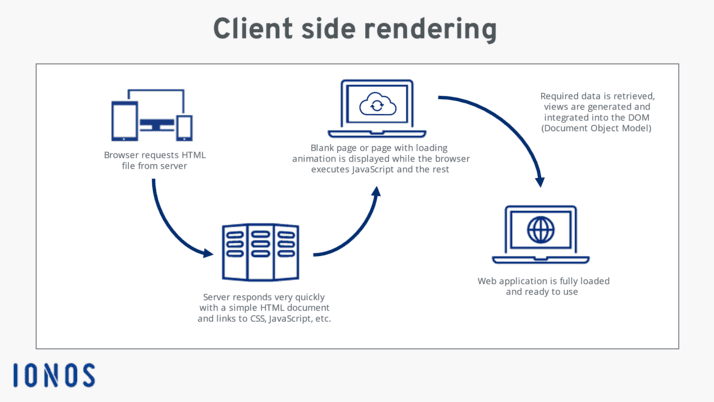
When you use CSR for your application, then only the HTML container will be rendered by the server. Everything else will be handled by the client. All the logic, data fetching and routing for the application will be handled by JavaScript.
Example with Next.js
Next.js uses server side rendering as a default rendering method. In this case we are not using any Next.js specific way of rendering the content. We are using useState hook from React to set a local state for our content.
const [item, setItem] = useState([]);

  useEffect(() => {
    async function fetchData() {
      const response = await fetch("");
      setItem(await response.json());
    }
    fetchData();
}, []);Example of HTML
The HTML of an application could look like the example below. All the content will be handled by JavaScript. This will of course increase the FCP and TTI for the website.
<div id="root"></div>What are the pros and cons of using client-side rendering?
☝️ SEO considerations
Search engine crawlers can handle server-rendered websites, but client-side rendering can cause issues. Some workarounds are needed for a client-rendered website to be SEO friendly.
☝️ Performance
The entire application is loaded on the first request and the code runs in the browser to change the view and data. This could have a negative effect for the user. On the other hand, as everything is loaded, the routing between the pages is faster.
Improving CSR performance
⚡ Budgeting JavaScript
As I mentioned, the entire website is being loaded on the first request. It is probably a good idea to have a budget on the JavaScript for your website. Code can then be loaded on-demand as features are needed.
⚡ Preloading
Preloading critical resources, such as JavaScript, can improve performance in client-side rendering. This tells the browser to start loading the critical resources earlier, so they are available earlier and do not block page rendering.
<link rel="preload" href="critical.js" as="script">⚡ Lazy loading
Lazy loading improves page load time by only loading non-critical resources when needed. Example: chat widget component can be loaded only when needed.
⚡ Code Splitting
Code splitting allows to split large bundle of JavaScript code into multiple bundles and lazy load them at runtime using tools like Webpack. This helps to improve the load time of the page.
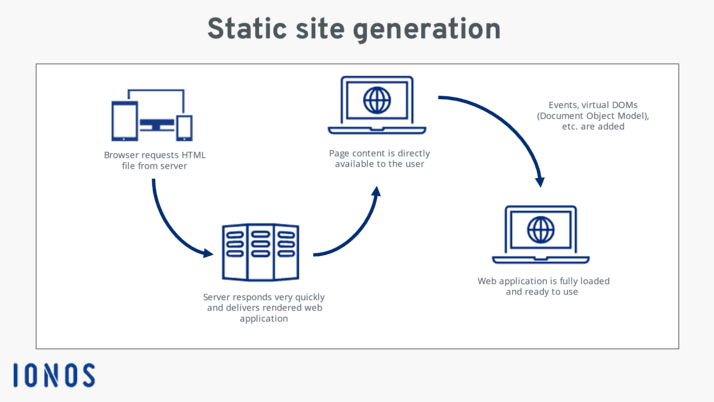
Static Rendering
Static rendering aims to resolve the server issues in SSR and large JavaScript bundles in CSR. It delivers pre-rendered HTML content that was generated when the site was built. These files are available on a server and are fetched as needed.
SSG - Key Considerations
🤔 A large number of HTML files
Static rendering (SSG) creates an HTML file for every route a user may access which can lead to a large number of files. For example, in a blog, an HTML file is generated for every post.
🤔 Dynamic Content
An SSG site is not suitable for highly dynamic content because it needs to be rebuilt and deployed every time the content changes. If the site is not rebuilt after a content change, the displayed content may be stale.
Incremental Static Regeneration
Static Generation (SSG) is suitable for rendering mostly static content, but not for dynamic or frequently changing content. For example, updating a blog post or adding a new one would require a rebuild and redeployment of the entire site.
Incremental Static Regeneration
To address this limitation, ISR was introduced as an upgrade to SSG. It allows for updating existing pages by pre-rendering a subset of pages in the background. This makes ISR more suitable for rendering large websites with frequently changing data.
What are the use cases?
One example: render the product page SSG and then display the stock with incremental static regeneration. Define a low revalidation period in getStaticProps. For example, revalidate: 60 would revalidate the price every minute.
How to use incremental static regeneration
To use ISR we can add the revalidate prop to getStaticProps. The user will continue to see the previous version (cached) of the page, until the page has finished revalidation.
// This function runs at build time on the build server
export async function getStaticProps() {
  return {
    props: {
      products: await getProductsFromDatabase(),
      // This will force the page to revalidate after 60 seconds
      revalidate: 60,
    }
  }
}How to use on-demand incremental static regeneration
When we set a revalidate time of 60 sec, visitors see same version for 1 min. We can manually purge the cache with On-Demand ISR for specific pages. We define a path with a secret token and create the revalidation API Route.
// pages/api/revalidate.js

function revalidate() {
  fetch('/api/revalidate?secret=<token>')
}

export default async function handler(req, res) {
  try {
    // This should be the actual path
    await res.revalidate('/path/to/page')
    return res.json({ revalidated: true })
  } catch (err) {
    return res.status(500).send('Error revalidating')
  }
}What are the advantages of using incremental static regeneration?
👍 Dynamic data
The first advantage is obviously why ISR was envisioned. Its ability to support dynamic data without a need to rebuild the site.
👍 Availability
A fairly recent version of any page will always be available online for users to access. Even if the regeneration fails in the background, the old version remains unaltered.
Example: Introduction
I have made an example with Next.js 13 and PocketBase for the database. Instead of using pages as the directory, I am using app which has support for layouts, nested routes, and uses Server Components by default. I am also using Turbopack which is their new bundler.
Example: Overview
In this example, there is a front page without content, a notes page, and dynamic pages for the notes. You can also add a note.
Example: Database
The database has a collection of the notes with a title field and a content field.
Example: Rendering
Here you can see how the different pages are being rendered. The home page is static with no data. The /notes page is being server side rendered. The dynamic notes pages are being SSG.

File: notes/page.tsx
This is the page containing all the notes, which could be the equivalent to a PLP.
async function getNotes() {
  // In Next.js 13 components are server components by default.
  // This means that we can use async await directly in the component.
  const res = await fetch(
    "http://127.0.0.1:8090/api/collections/notes/records?page=1&perPage=30",
    // The content is automatically cached by the browser, so we need to disable it
    // so that we fetch the latest data from the server on every request.
    { cache: "no-store" }
  );
  const data = await res.json();
  return data?.items as any[];
}

export default async function NotesPage() {
  const notes = await getNotes();

  ...
}File: notes/[id]/page.tsx
This is the dynamic route for the notes, which could be the equivalent to a PDP.
async function getNote(noteId: string) {
  const res = await fetch(
    `http://127.0.0.1:8090/api/collections/notes/records/${noteId}`,
    {
      // We can update the caching behavior of the request by passing in the
      // revalidate option. This will tell the browser to regenerate the page
      // on the server after 10 seconds.

      // This is also called Incremental Static Regeneration.
      next: { revalidate: 10 },
    }
  );
  const data = await res.json();
  return data;
}

export default async function NotePage({ params }: any) {
  const note = await getNote(params.id);

  ...
Example: Adding with incremental static regeneration
Here I am using incremental static regeneration. The content gets updated.

Example: Adding without incremental static regeneration
Here I am not using incremental static regeneration. The content is not being updated.
